This Fleece Knight Helmet Hat with tutorial and free pattern makes the perfect Halloween costume. So many people have made and loved this hat, and you will be sure to love it too!

If you have a little knight in your life, this is the perfect thing to make for him. This is a great beginning sewing project. Fleece is so forgiving and easy to work with. This project is bound to be a success.

Pattern for Helmet Hat
The base for this hat comes from this amazing Dinosaur Hat from Stitched. I switched out the spikes for the red piece in the back, and changed the ear piece to be a little more square. Then I added a front piece with buttons that can flip down, flip up, or just be taken off.
This hat was made for a head that is 22 inches around. You can can scale the pattern up and down accordingly.
Here is the pattern on three sheets:
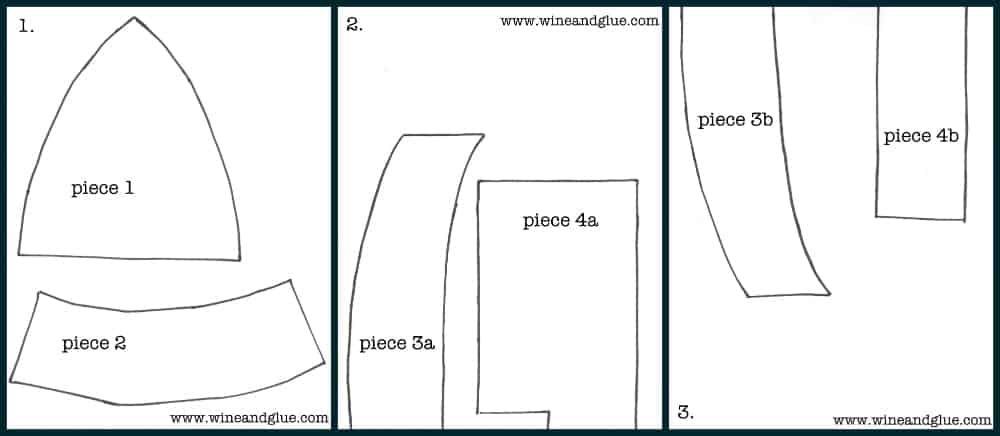
Download page 1 here | Download page 2 here | Download page 3 here

Materials
- Half a yard of gray fleece
- Less than a quarter of a yard of red fleece
- Two red buttons
How to Make a Fleece Helmet Hat
Step one: Print out the pattern. Once you have printed out all three sheets, cut all the pieces of paper out, and tape together piece 3a to piece 3b and piece 4a to piece 4b.
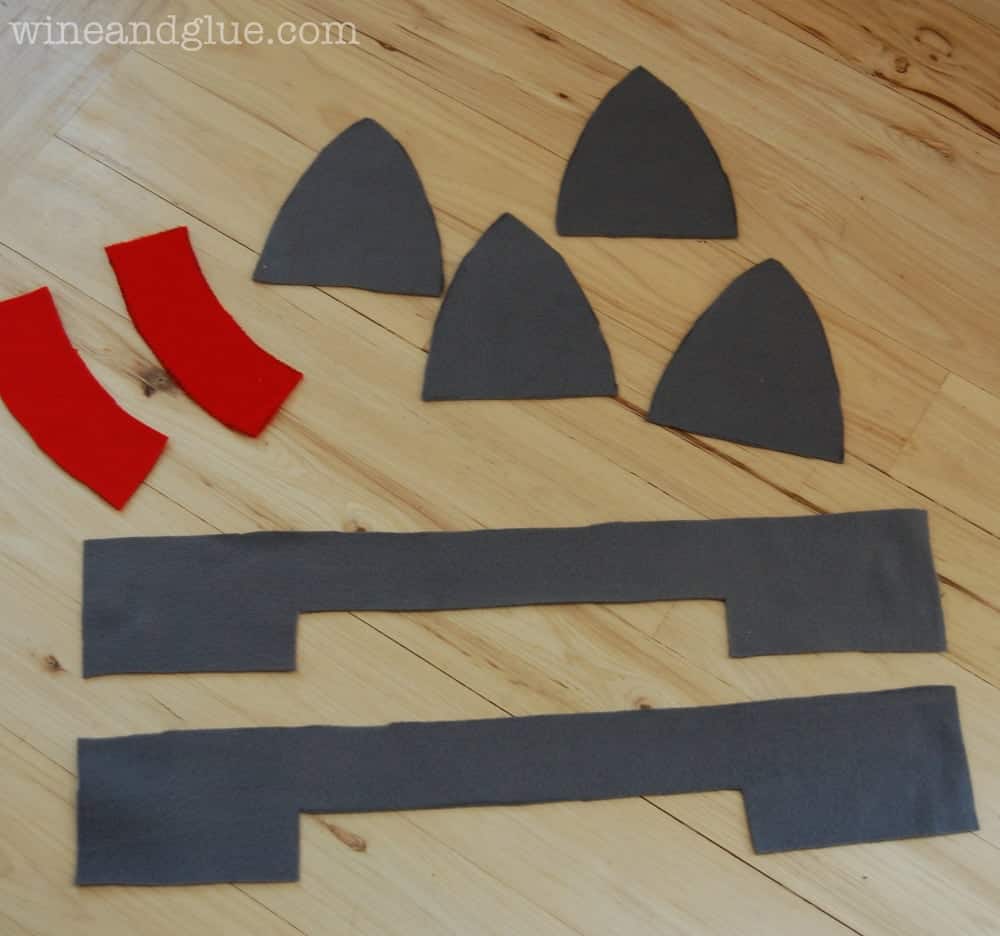
Step two: Cut out the pieces. Cut four “Piece 1” pieces from the gray fleece. Cut two “Piece 2” pieces out of red fleece. Cut the pattern pieces for 3a and 3b and tape them together. Then cut two “Piece 3” pieces. Repeat this process with 4a and 4b. The photo below shows all the pieces cut out with the exception of piece 3.
Step three: Pin the pieces together. Line up the duplicate pieces (for example the “Piece 4” pieces you see in the photo below). For the top of the head, it will pin together to make a hat shape. There are helpful photos of this in the tutorial over on STITCHED. But do not pin it all the way to the top.
Step four: Sew the top of the hat together. Use a half inch seam allowance for everything. Now sew one side of a piece 1 to another side of a piece 1. Repeat that with the two remaining piece 1’s. Sew the red pieces together and flip inside out. Now you can complete the top of the hat. Pin the two sides of the hat together with the red part on the inside sandwiched between the right sides of the fabric.
Step five: Make the bottom of the hat/ear flap. Now sew together the two piece fours, leaving the wide piece at the end open. Once it is sewn together, flip it so that the right sides of it are together, and sew down the length of the wide part. This will make it a full circle.
Put the top part of the hat inside the ear flap circle. Make sure that the red piece that goes in the back is lined up with the widest part of the ear flap that goes in the back. Pin it in place. Sew around.
Step six: Make the front part of the hat that moves up and down. Sew the two piece 3’s together, leaving a small two inch gap. Flip it inside out, and then top stitch around it.
With your kid having the hat on very carefully pin piece 3 in place, add buttons, cut holes in piece 3, and you are done!

Other Easy Halloween Costumes
We have other easy Halloween costumes too! Tackle one of these simple projects next!


Lisa says
Sorry chest not cheesy.. lol gotta love phones.
Miriam says
Hi saw your fudge recipe thru pinterest while searching for a hat pattern, and i would like to make some but what is cookie butter and how do i make it , thanks
Hi Miriam! I think that you would probably find this post most helpful: https://simplejoy.com/2013/10/homemade-cookie-butter.html
suzy says
love this! thanks so much for posting the pattern. i made mine out of felt so skipped a few steps. pattern was great and it came out perfect for my 3 year old. thanks again. :-)
Ayelet says
This looks wonderful! I have two boys that are happy to be knights for Halloween. Do you have any asstimation how much extra fabric you need for the armor and the sheild? Are those from the same fleece or felt?
Halloween is right behind the corner…. :-)
I totally missed the boat on replying to this comment Ayelet! The shield and the armor are made out of fleece, and I’m pretty sure I got two yards of the dark fleece.
Joke says
What a great had! My sun wants to be a knight at carnaval and I want to make him you’re helmet but … how do I reduce the patern?… My son’s head is 20 inch…
thanks!!
Joke
So, I would suggest you can either for for it with this pattern for a 22 inch head because before long he’ll grow into it, and it’s not like it will be SO BIG that it will flop over his eyes. Orrrrrrr, because 20 divided by 22 is 90.9, when you print this you could put in 91% into your printer settings so it will print smaller. Does that make sense?
veerle says
one happy knight and one happy mom … the most comfortable helmet ever! thanks!
Yay! Thank you!
Andrea says
The “frock thing” is called a tabard. It originally would have been a piece that went over the armor to show off ones heraldry.
Leslie says
Thank you for this! I just whipped one up for my great-nephew (soon to be 5). After I fixed the broken strap on a homemade shield he had he said he needed a helmet. I introduced him to Pinterest and he chose yours! He’s tickled with it!
Thanks Leslie!! I’m so glad it turned out well!
Gisela says
Thank you very much! you have saved me for my son’s Christmas show. Kisses from Mallorca (Spain).
That’s great!
Angela says
thank you for posting this, my son is happy with his helmed. Hij wanted to be Mike the Knight so made it in blue.
You are welcome!
Marlene says
Hey !
Many thanks for the tuto, I’ve just finished a helmet for my 4 years old son.
He’s very proud of it (and me too !)
It was not so easy for me because of different units (I’m french) but with your very usefull pattern it was ok !
I’ve planed to join a picture but it seems to be not possible in this comment box…
BR,
Marlène
I’m so happy you liked it!