This Fleece Knight Helmet Hat with tutorial and free pattern makes the perfect Halloween costume. So many people have made and loved this hat, and you will be sure to love it too!

If you have a little knight in your life, this is the perfect thing to make for him. This is a great beginning sewing project. Fleece is so forgiving and easy to work with. This project is bound to be a success.

Pattern for Helmet Hat
The base for this hat comes from this amazing Dinosaur Hat from Stitched. I switched out the spikes for the red piece in the back, and changed the ear piece to be a little more square. Then I added a front piece with buttons that can flip down, flip up, or just be taken off.
This hat was made for a head that is 22 inches around. You can can scale the pattern up and down accordingly.
Here is the pattern on three sheets:
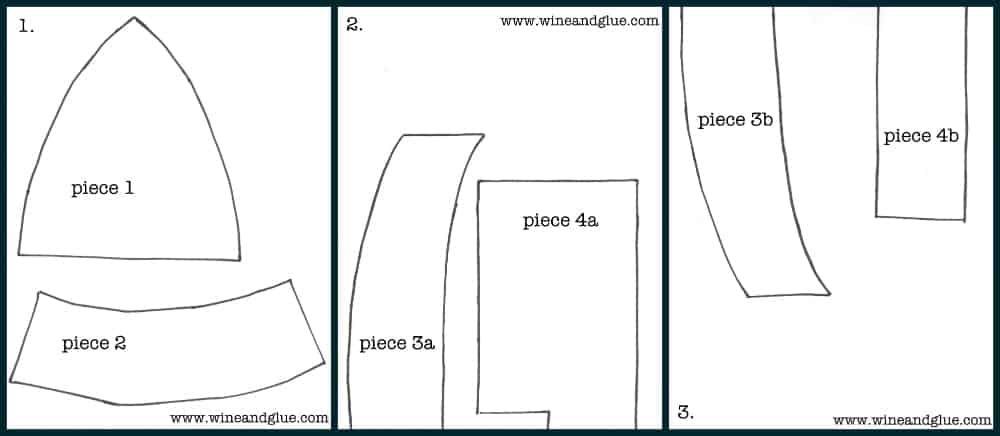
Download page 1 here | Download page 2 here | Download page 3 here

Materials
- Half a yard of gray fleece
- Less than a quarter of a yard of red fleece
- Two red buttons
How to Make a Fleece Helmet Hat
Step one: Print out the pattern. Once you have printed out all three sheets, cut all the pieces of paper out, and tape together piece 3a to piece 3b and piece 4a to piece 4b.
Step two: Cut out the pieces. Cut four “Piece 1” pieces from the gray fleece. Cut two “Piece 2” pieces out of red fleece. Cut the pattern pieces for 3a and 3b and tape them together. Then cut two “Piece 3” pieces. Repeat this process with 4a and 4b. The photo below shows all the pieces cut out with the exception of piece 3.
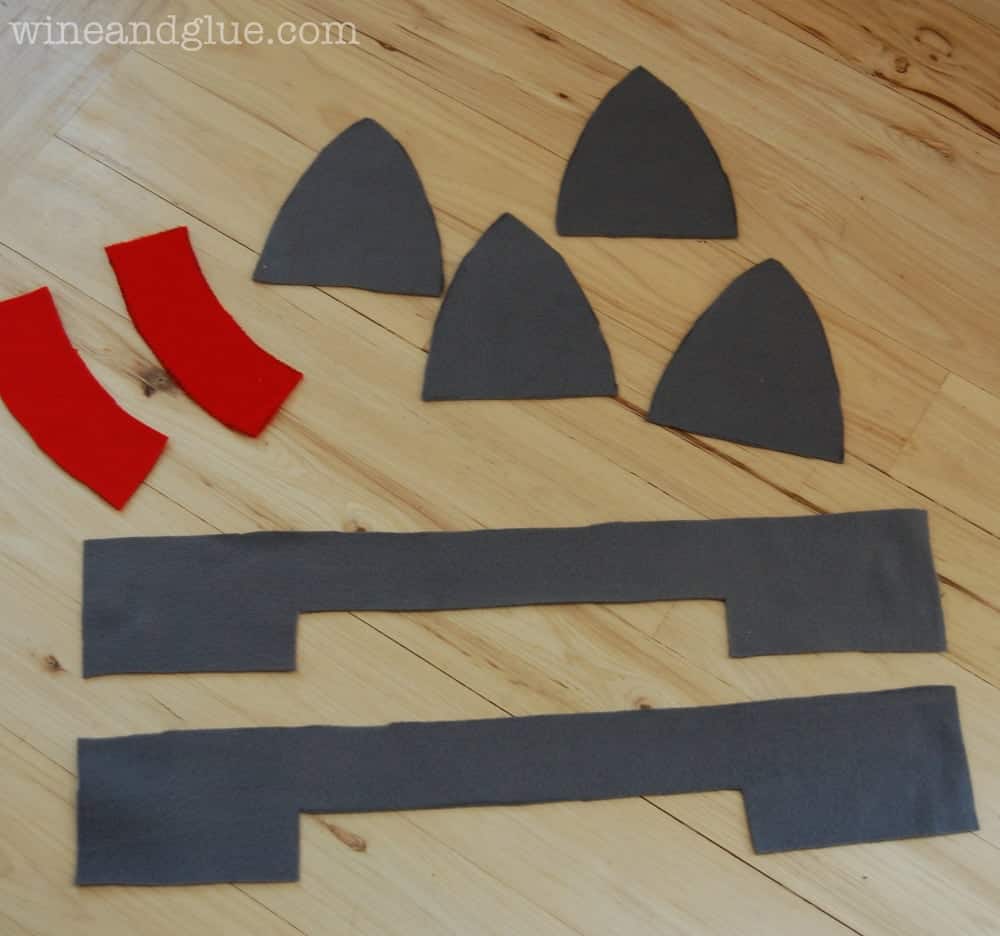
Step three: Pin the pieces together. Line up the duplicate pieces (for example the “Piece 4” pieces you see in the photo below). For the top of the head, it will pin together to make a hat shape. There are helpful photos of this in the tutorial over on STITCHED. But do not pin it all the way to the top.
Step four: Sew the top of the hat together. Use a half inch seam allowance for everything. Now sew one side of a piece 1 to another side of a piece 1. Repeat that with the two remaining piece 1’s. Sew the red pieces together and flip inside out. Now you can complete the top of the hat. Pin the two sides of the hat together with the red part on the inside sandwiched between the right sides of the fabric.
Step five: Make the bottom of the hat/ear flap. Now sew together the two piece fours, leaving the wide piece at the end open. Once it is sewn together, flip it so that the right sides of it are together, and sew down the length of the wide part. This will make it a full circle.
Put the top part of the hat inside the ear flap circle. Make sure that the red piece that goes in the back is lined up with the widest part of the ear flap that goes in the back. Pin it in place. Sew around.
Step six: Make the front part of the hat that moves up and down. Sew the two piece 3’s together, leaving a small two inch gap. Flip it inside out, and then top stitch around it.
With your kid having the hat on very carefully pin piece 3 in place, add buttons, cut holes in piece 3, and you are done!

Other Easy Halloween Costumes
We have other easy Halloween costumes too! Tackle one of these simple projects next!


Bettina says
Hello, i want to sew the knight helmet. I don’t understand for what ist the piece no. 2? Regards Bettina
Piece 2 is for the red piece that goes on top of the helmet.