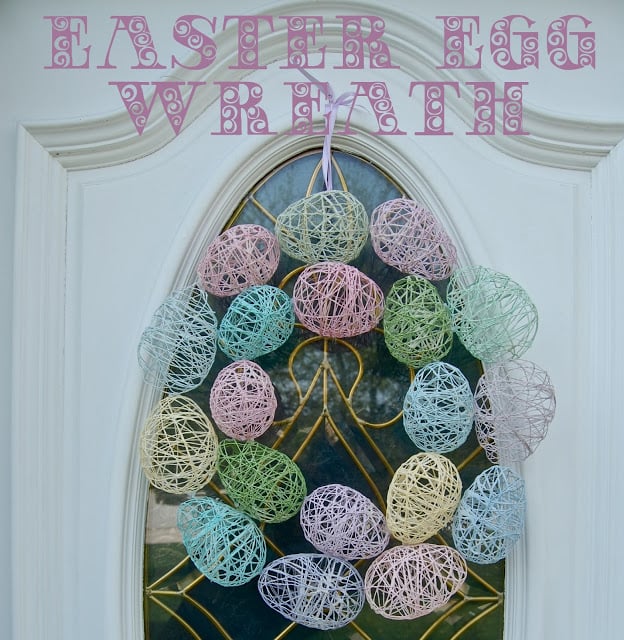
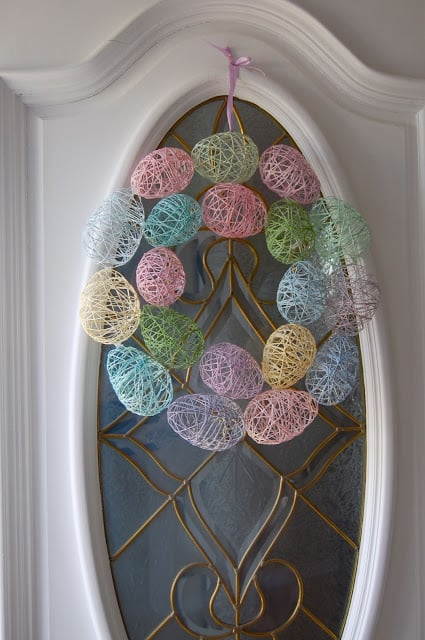
This Easter Egg Wreath is a simple and easy DIY! This Easter Wreath DIY is less than $10 to make, and is so pretty. It is delicate but holds up year after year!
I love spring!
Since seeing this idea way back in like January, I have wanted to use it to make an Easter egg wreath. There are tons of people out there trying their hand at this, but my absolute favorite is found here. More recently, Alissa, at Crafty Endeavor did this post about making an Easter Egg Garland. Alissa is smart, and she made this project about a million times easier for me.
Easter Egg Wreath Supplies
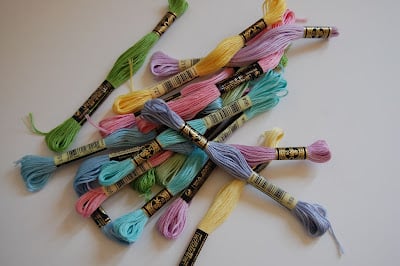
First, you need a lot of embroidery floss, about 20 to 25 skeins, in lovely pastel Eastery colors.
Next, you need to make your starchy bath. For that you need:
- 1/2a cup of all purpose flour
- 1 cup Sta-Flo liquid starch
Next you need some balloons. For this you have two options:
- Water balloons – they make the perfect shape, but they are very hard to blow up. Some readers have suggested using a pump, which is a great idea.
- Full sized balloons – they are very easy to blow up, but you have to be careful not to blow them up too much or you will get spheres instead of eggs. Additionally, you need to make sure you tie them very tight or they will leak and deflate before your string dries.

How to Make an Easter Egg Wreath
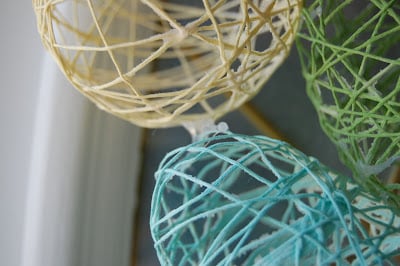
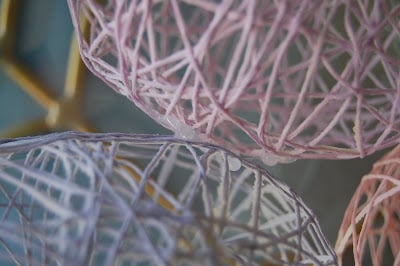
- Carefully put one skein of embroidery floss into the starchy mixture by unraveling it into the mixture in nice loops (pictured above). Resist the urge to just throw it in, or it will become a gloppy mess.
- Blow up your balloons.
- Working over wax pepper, begin to wrap the floss around one balloon, using your fingers to pull off excess liquid as you go. Make it go through two tightly pinched fingers before it makes its way on to the balloon. One skein will go perfectly around one balloon.
- Place the wrapped balloon on a piece of wax paper and allow to dry over night.

- In the morning, flip all the eggs over and let them finish drying for a few hours.
- Once the embroidery floss is completely dry, pop the balloons. (Note: It helps to push the balloon away from the dried floss a little before popping.) Carefully remove the balloons from the inside of the egg and use a needle or toothpick to work away any excess dried starchy liquid.
- Finally, set a bowl on wax paper and use it as a guiding shape to form to circles around with the eggs, hot gluing them together as you go. It helps to form the wreath completely, arrange the colors how you want them, and then remove one egg at a time to glue it in.
And here it is hanging up.
Easter Egg Wreath Cost
Your wreath shopping list:
- 20 skeins of embroidery floss (I ended up using 19) – they were $0.35 each at Michaels and I used a 20% off of everything coupon because I’m thrifty like that
- Sta-Flo – about $2.50
- Water Balloons – about $0.50 if you have good lung capacity
- Other things you hopefully have: Hot Glue Gun and Hot Glue, Wax Paper, Plastic Bowl, Flour, Ribbon for hanging
So if you’re keeping track, I did it for under $10. Not bad for a fancy looking wreath.


Cynthia says
I love your Easter egg wreath, making my list and buying everything to make me one snd one for my daughter.I think she will love it on her door as well.Thank you for sharing.
Thanks Cynthia!
Jan says
I have made these using 1 large balloon, crochet thread and the Liquid Starch found in the laundry section of grocery stores. I wound crochet thread around the balloon, then poured the liquid starch into a 9×13 cake pan, placed balloon on top of a mason jar ring to dry..This will vary in time due to humidity in ones area. Once good and dry I cut an oval shape on the egg, add Easter grass and add candy. I store in a box and place on shelf of closet, cool and dry for use following year. I have never tried adding flour to starch,,,
Shelly says
Just a little FYI you can remove hot glue with a little rubbing alcohol :)
Karen Williams says
You can use a simple syrup instead of glue or Staflo. Wrap the floss and paint it with a brush. I used to make Easter baskets for friends with that solution.
Hazel Hamilton Drake says
You can use liquid starch too, it works great.
J. Hawbaker says
Homemade liquid starch
Process:
Put the cornstarch in the sauce pan and first whisk in about ¼ cup of the water to make an even slurry, then whisk in the remaining water.
Place the pan over medium heat and whisk constantly. …
The starch will thicken as it cools. …
Refrigerate the starch when not in use to prevent spoilage.
Shelby says
Small balloons always need a hand pump to blow them up. Almost impossible to do it without this,
Well . . . not impossible. I did it.
Toni Fechter says
Do you use the cotton or satin embroidery thread?
I used embroidery thread, though I know that people have done it with yarn. I’m not sure it makes a difference.
Lee says
By looking at the photo of the thread she used it looks like the cotton thread. I am an avid cross stitcher and this is the thread I use…..it is also called embrodiery floss ?
Kimmy Nickle says
I’m curious… Why water balloons instead of regular balloons that maybe aren’t blown up the whole way so they’re small?
Because I like making life harder Kimmy ;)
Ashley says
My momma and I made these!!! Turned out adorable!!!! A little helpful TIP: after we popped the balloon and took it out we got a tooth brush and rubbed off all the extra dried starch around the egg, and it also brings back the color of the string and makes it brighter again!!!!!
Oooo, that’s a GREAT tip! Thank you Ashley!